If you’re new to DJing or just about to get started as a DJ, then a DJ mixer can appear overwhelming. When broken down into simple parts the DJ mixer is quite easy to understand. In this ‘how to’ guide, we go into detail about how to use the most basic and frequent sections of a DJ mixer.
Note that the most basic sections are common across all DJ mixers, whether it be on a stand-a-lone DJ mixer, DJ controller or all-in-one DJ controller, even DJ software has the most basic DJ mix features. Let’s get stuck into the ins and outs of a DJ mixer.
In this Guide we will look at the DJ mixer of both a Behringer DJX750 (you can see my review here) and a DDJ-400 Pioneer DJ Controller.
DJ Mixer Guide Overview
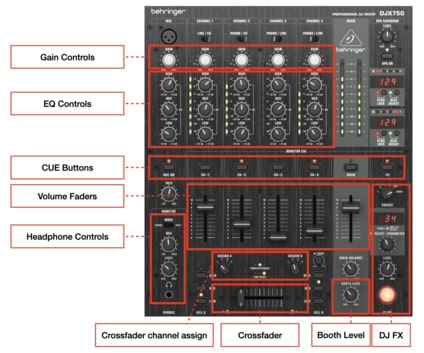
Front of DJ Mixer (Main Controls)
Headphone Controls
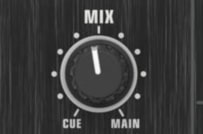
This particular switch control allows a DJ to switch between the Cue, Mix and Master.
Cue only allows DJs to hear audio when the cue buttons on the mixer are activated. The goal of this setting is to allow a DJ to cue up a track that’s about to be mixed, e.g. finding the first beat to start beat matching.
Mix allows DJs to hear both audio from channels with the Cue button activated and the audio from where the crossfader is set. The goal of Mix is to allow DJs to sense check the beat matching is accurate before they switch the crossfader into the middle.
Master allows DJs to only hear audio of what is being played through the speakers. Usually where the crossfader is set. The goal of master is to allow DJs to hear what’s going on live to the audience
Headphone Volume
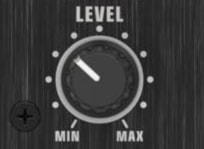
Volume is a simple switch by controlling the volume that a DJ hears in the headphones. This does not control any other volume related to volume arriving to the speakers that your audience is listening to.
Cue Buttons

Cue buttons are activation buttons, set per channel on a mixer, that allow DJs to hear a particular channel. You can hear one channel on it’s own or multiple channels can be heard at any one time.
Cue buttons are usually used by clicking one channel on for one channel, and then listening to that one channel in the headphones. (remember, this is why ‘Cue’ is set on the headphone controls.
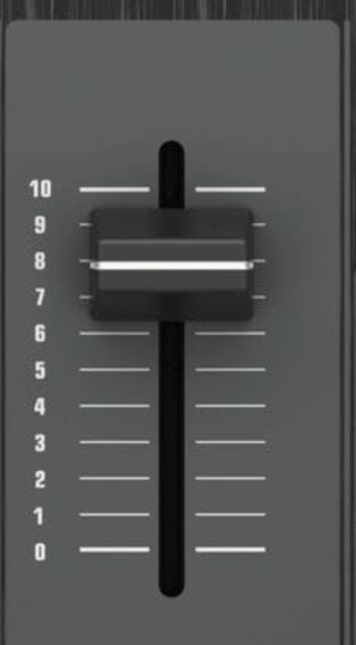
Channel Faders
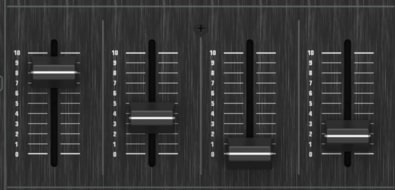
Channel faders are simply controls for volume per channel.
Some DJs like to use faders to mix from track to track, however the genre of music and style of DJing can dictate how DJs use these faders.
Crossfader
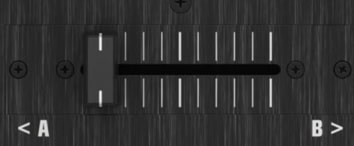
The crossfader allows DJs to transition from one track to another. A crossfader slowly blends and mixes in two channels together and then eventually fades out the two tracks.
If the crossfader is moved to the middle (inbetween A and B) then audio from all channels is played, regardless of whether audio is being played on more than 2 channels, e.g. 3 or 4 music tracks can play at the same time.
This is why you’ll see a DJ mixing using the channel faders (with the crossfader in the middle) if they are mixing with 3 or 4 turntables / CDJs for example.
Crossfader Channel Switches
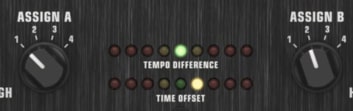
It’s important to set which channel number to activate so that you can accurately mix from the correct channels on your mixer.
For example, if you’re mixing music on channels 2 and 4, then make sure to “assign” channel 2 to A (which is the crossfader set to the far left), and “assign” channel 4 to B (which is the crossfader being set far right).
Want to learn DJing? Click here for our latest DJ Course.
Crossfader Curve Switch
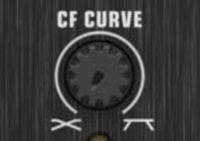
The curve in which audio is mixed from one channel to another using the crossfader can be set.
A switch can change the curve. The reason for this is that different genres and DJ techniques require DJs to either quickly or smoothly transition from one track to another.
If the curve is set to the table looking logo, then as soon as you move the crossfader a slight bit over the audio of the new track will sound at nearly full volume. Great for scratch DJs and Hip Hop music where music is dropped on the one for example.
The X looking logo is the opposite of the above. It allows DJs to gradually and smoothly transition from one track to another but gradually building up the volume into the mix. Great for DJs that beatmatch and blend in full sections and phrases of music tracks.
Master Fader
Master fader is simple, it controls the volume of the audio that is going to the speakers.
This is all audio going out of your DJ mixer.
The master fader is usually the channel outputs that are connected to the main speakers. In a club this might be where cables are connected to the DJ mixer then to an external mixer which then connects to speakers. These are the main speakers that play to your audience e.g. in a club, bar, wedding venue, party venue etc.
Booth Level
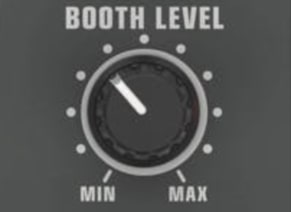
If you’ve heard the name “DJ Booth” then you might of noticed that DJs have their own speakers in the DJ Booth.
Booth is another output that allows DJs to connect speakers, alongside the master output speakers. The booth level simply controls the volume level that’s reaching speakers that are connected to the booth outputs on the back of the DJ mixer.
DJs have speakers in the DJ booth to allow them to get accurate feedback of audio to sense check that are beatmatching and mixing accurately. It’s hard to rely on listening to the main speakers due to potential feedback delays.
EQ Knobs
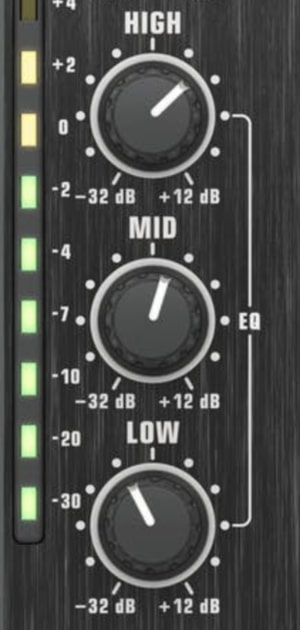
EQ knobs allow DJs to subtract specific frequencies of a particular channel in which audio is playing.
These EQ controls can help DJs mix and blend between two tracks better than just simply using the crossfader.
Subtracting EQ allows for de-muddying the audio in the mix and allow clarity of audio.
Gain
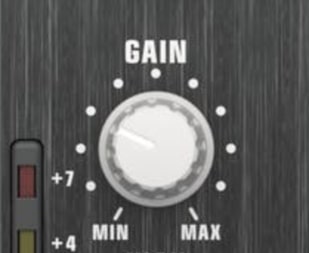
Gain is the signal in which is arriving to a particular channel on your DJ mixer.
Controlling the gain (or “Trim” known on some DJ mixers) is important to help keep your channels out of the ‘red’. You’ll see LED lights popping up on each channel which indicates if you’re distorting the audio quality on a particular channel on the mixer.
Tip: always aim to be in the amber or green, never red as this can distort the quality of the audio arriving to the speakers, sounding awful to your audience.
FX
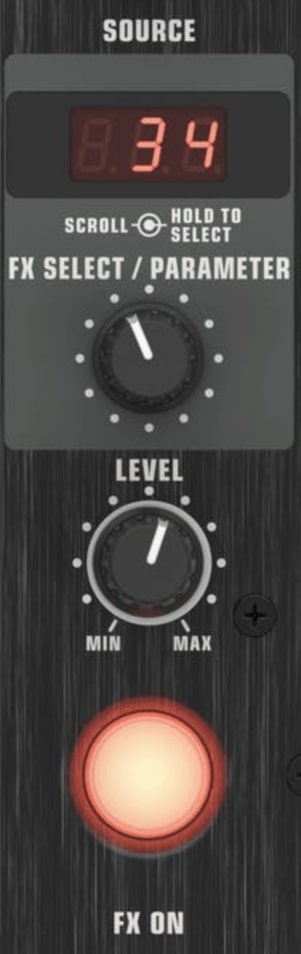
ON/OFF Button – This button simply activates the FX on or off.
Volume – Is simply how loud the FX is applied to the audio source on the DJ mixer.
Source – Is the channel on the DJ mixer in which the audio is being applied. E.g. channel 1, FX would only be applied there, or MAIN the FX would be applied to the master channel AKA all music playing from the DJ mixer.
FX Select / Parameter – Simply allows you as a DJ to pick the audio FX that you desire to apply to music in your mix.
Back of DJ Mixer (Ports and Connections)
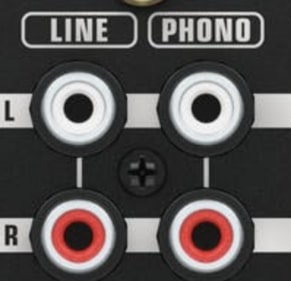
Channel Inputs
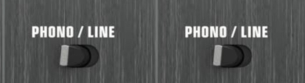
You’ll notice on the front of the DJ mixer that there’s a switch to flick between Phono or Line. This simply is a switch to use depending on which equipment you’ve plugged in, either Phono or Line, which is explained in detail below.
Phono
Phono is an input connection that allows an RCA cable to plug into it. Usually the Phono is then connected to a turntable. Don’t plugin your CDJs into the Phono inputs as they are not purposed for this input connection.
Check out how to set up a mixer here.
Line
Line inputs on a DJ mixer are compatible with CDJs but also other devices such as smart phones or DJ Controllers too.
Main Outputs
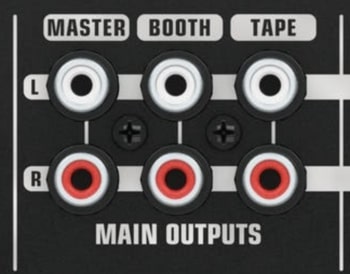
Master – is the main phono connection out of the DJ mixer, usually connected to an amp, direct into speakers or sometimes into an external mixing console.
Booth – booth outputs are for connecting to speakers that are featured in the DJ booth. It is of course possible to use booth to connect to the speakers in your home studio if you need or wanted to.
Tape – is an output connection that allows you to connect to a recording device to record your DJ mixes.
Related Questions
What are the buttons DJs pressing?
The main buttons are knobs on a DJ mixer being used by DJs are Cue Buttons, Faders, Crossfaders, EQ and Headphone controls.
Why do DJs use cue button?
Cue button allows a DJ to listen to a track in their headphones, this can be a track playing live in the speakers, and more often a track that is about to be beatmatched and mixed in with the current live track. This allows a DJ to cue up the next track before the audience listens to it. Hence the name ‘Cue’ button.