If you’re like many DJs out there, the desire to DJ live online is high. Especially to keep your family, friends and fans updated with the world of your music and DJing skills.
Figuring out how to DJ live is a bit of a minefield and can take some time to get together especially from an equipment and technical setup point of view. Copyright takedowns can be an issue to overcome too. So if you want a simplistic and hassle free from copyright takedown situation then you’re in safe hands. Beatmatch Guru has got a simple and effective process for you to stream live.
I’m using a MacBook Pro, iPhone 11 and a Pioneer DDJ-400 to setup the equipment ready for live stream, here are the steps to take to connect it all together.
- Step 1: Download BlackHole
- Step 2: Setup Audio MIDI Outputs
- Step 3: Set Up Rekordbox Preferences
- Step 4: Download NDI app to iPhone
- Step 5: Download OBS
- Step 6: Sign up to Mixcloud Live
- Step 7: Final Settings for Streaming Your DJ Set Live
Before reaching the step by step process, here’s a simple diagram of how the DJ equipment, iPhone and software work together for live streaming your DJ set.

Step 1: Download BlackHole
Firstly you will need to download BlackHole from this link here.
Why download BlackHole?
BlackHole allows you to combine Master Output and Blackhole within Rekordbox DJ software. Allowing you to hear audio from your speakers AND importantly send your live audio to OBS and onto MixCloud. You and your audience will be able to hear the music you are DJing live.
This amazing download allows you to combine sound card outputs, which means you can play both out of your speakers and through MixCloud to your live stream at the same time.
- Click on the download link
- Enter your details and email
- An email will arrive with the download link
- Click the download link from the email
- Downloading will commence
- Go through the normal steps when downloading a .dmg file for Mac
NOTE: sometimes your MacBook will block your download from opening. Go to ‘Security & Preferences’ (type this into your search bar at top right of your screen), then click ‘Open Anyway’. From here you will be able to download the file.
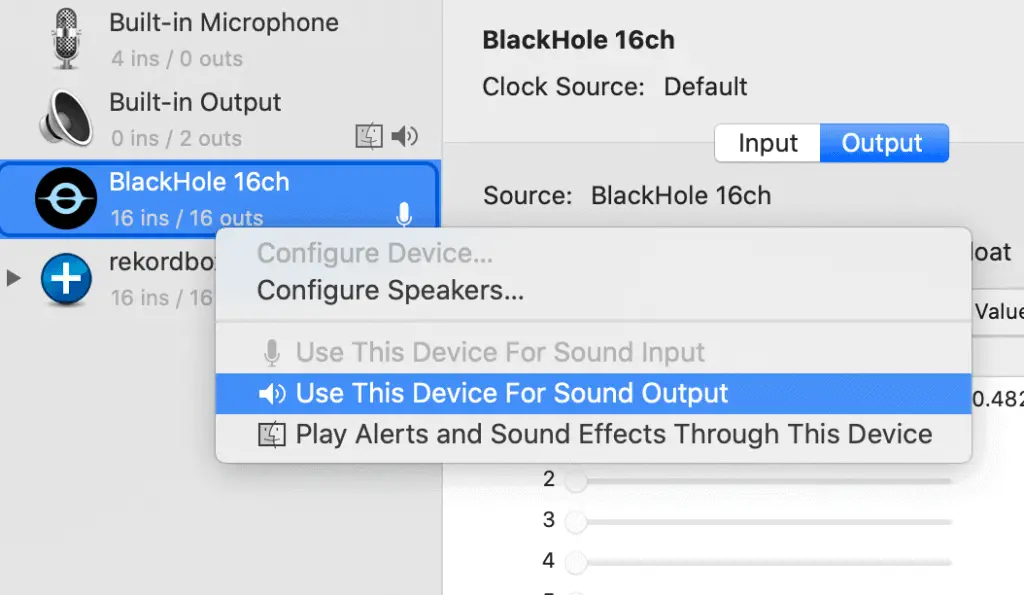
Step 2: Setup Audio MIDI Outputs
In the search bar at the top right of your screen on your Macbook. Type in ‘audio midi ouput’.
A screen will pop up allowing you to select the correct output for your computer.
Navigate to BlackHole, right click and select ‘Use this device for Sound Output‘.
Step 3: Set Up Rekordbox Preferences
Now BlackHole is downloaded onto your MacBook then you’re good to go and adjust the Audio preferences on Rekordbox.
Connect your Pioneer DDJ-400 or equivalent DJ controller
Open Rekordbox, click on Preferences, open up the Audio tab.
In the preferences box, click on the drop down selection and select:
- Audio > “DDJ-400” Or the name of your controller
- Tick the option below it: “Output audio from the computer’s built-in speakers and your DJ equipment (PC MASTER OUT)“

The second setting that you need to amend is below which is the essential aspect to this setup.
Select the option that combines both MASTER and BlackHole. In this case…
“DDJ-400 : MASTER + BlackHole 16ch“

This will allow you to play both out of your speakers and via the live stream which is later setup in OBS via Mixcloud.
Step 4: Download NDI app to iPhone
NDI HX Camera
To get ready to stream your live set visually using a camera I’ve downloaded NDI HX Camera from the App Store.
This nifty little app will allow you to stream you DJing live and act as a webcam. I tried using the normal camera and that didn’t work because all of the icons around it show.
Once you’ve got NDI up and running on your phone, simply open it, get your phone in the appropriate setup position that will help record you in all your DJing glory.
Connect the iPhone to your computer using the USB cable that comes with it. Don’t forget to click ‘Allow’ on the iPhone when you’ve connected to allow the computer access to it.
Top Tip: If you have a USB hub that connects to the laptop and then you connect the mobile phone cable to that then this might not work. I’ve found that OBS picks up the webcam when you directly plug the phone into the laptop itself. I know this because 5 minutes before going live it was nearly very embarrassing.
Camera for OBS Camera

OBS offer a camera app too, which costs money around £15.99. I will probably move to this app soon as NDI has logo on it which you can’t remove from the screen with is annoying but not impossible to cut out of the screen using OBS. See the link here.
Step 5: Download OBS
Next up, if you haven’t already got hold of it, download OBS. Click on the link here.
Why Download OBS?
OBS is a great software, it combines live audio inputs and video inputs, allowing syncing up settings to your streaming service (Mixcloud in this instance) to go live to the world.
Setting up OBS is key here as you need to add your devices to it. In doing so the setup will allow you to link together the audio of your DJing and the visuals from your webcam (iPhone in this instance).
Add Webcam via iPhone
- Open OBS
- Click on the + sign
- Click on “Video Capture Device”
- Next to “Device” click on the iPhone to connect the visuals
- This is when you need to open NDI app on your phone
- You should see the visual on the ODS software for the iPhone by then
- Then click “Ok” then you’re done
Add DJ Controller to Input Sources
- Open OBS
- Click on the + sign
- Click on “Audio Input Capture”
- Name the device, in this instance “DDJ-400”
- Click “ok”
- Then on the drop down menu select “BlackHole 16ch”
Now you are ready to move onto Mixcloud, get that setup. Remember you will have to come back to OBS for some final stream key settings and to click “Start Streaming”.
Step 6: Sign up to Mixcloud Live
Next, you will need to sign up to Mixcloud and start a Pro account, which currently in May 2020 it’s free for 90 days. Thereafter it costs £9.00 per month, and there’s opportunities to monetise your account to reap the costs back too.
Sign up to the Pro account here: https://www.mixcloud.com/pro/
Add all the relevant information to your Mixcloud profile such as your profile image and background etc, get all the basics straight if you haven’t done so already.
Once you’re ready and setup then you need to go to this page here to get started in the next section, step 7 will be your final setup step.
Go here: https://www.mixcloud.com/live/new/
Step 7: Final Settings for Streaming Your DJ Set Live
On the page above you will notice a place to enter in your live stream name, so go ahead and do that now.
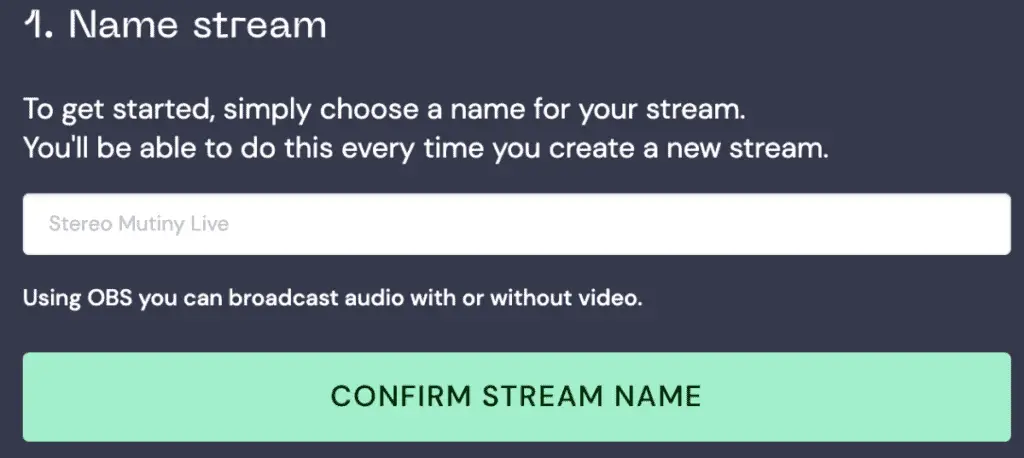
Click on ‘CONFIRM STREAM NAME’ once you’ve done that.
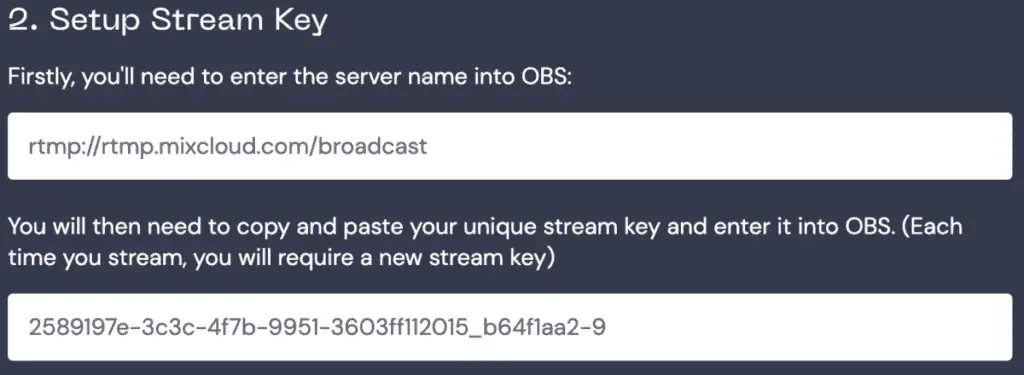
Next, you will see the serve name and stream key. This is important step in the final process.
Note: each individual live stream that you do, you’ll need to generate a new stream key every time, however the server name will stay the same.
Now it’s time to go back into OBS for the final setup stage.
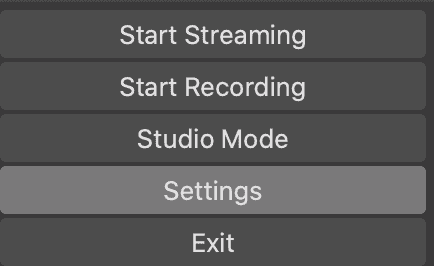
Go back to OBS and click on ‘Settings’.
Click on “Stream”, copy and paste the Server name from Mixcloud above into the relevant “Server” entry field below.
Do the same for the stream key field too, copy the stream key from Mixclou, highlighted above, and paste it into the Stream Key field. Click show to double check you’ve pasted in the correct stream key.

Now you are good to go.
Set up you camera in a great position that’s comfortable and in a decent angle for you stream yourself.
I’ve got a Lamicol phone stand to hold my iPhone in place in a position that’s easy for my viewers to see the stream. See here.

Now you can click on “Start Streaming” in OBS.
Go back to Mixcloud and you should see your stream pulling through as a ‘Preview’.
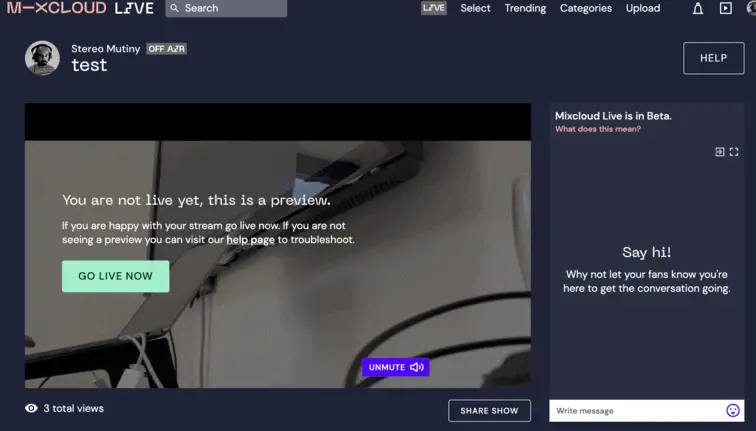
Adjust the camera to your liking and any final adjusts, once you’re ready to go, cue up your DJ track and then click: “GO LIVE NOW“.
Share you link in the browser with your friends, family and followers online.
Usually the URL to share your live stream is the URL www.mixcloud.com/live/YOURPROFILENAME/.
Enjoy streaming!
Make sure to add the first comment to the comment box at the side to interact with your viewers.
Tips for Better Live Streaming Your DJ Set
Test Your Equipment, Setup and Live Stream
At least 15-20 minutes before test out your equipment, from testing the DJ controller and music coming our of the speakers.
Make sure the live stream is previewing correctly in the preview. You can do this by sending a link to another phone and testing it that way, check for the audio and video is appearing correctly.
Make sure the stream key is set up correctly, because remember Mixcloud requires a new stream key each time it is launched for live streaming.
Check the video is working just fine. I’ve had issues with the cable not working and required me to change the cable last minute.
Build Buzz Before Your Set: Tell Everyone!
Get on WhatsApp, social media, email friends, phone people and tell them about your DJ set that’s going to be streaming live.
The only way to get your name out there is by telling and asking as many people you know about your live stream. This is a great way to spread word of mouth about your DJ sets.
Remember to tell everyone the correct details of your live stream set including URL link to the live stream set, time, and specific date. Aways send a reminder an hour before too to prompt everyone.
If you’ve already got a website with a blog and following, then you might have an email list. So utilise your email list, be really proactive and tell those who follow you on your email list.
Record your set and share or promote afterwards
OBS is a great bit of software. As well as ‘Start Streaming’ there’s a great function that you ‘Start Recording’ too.
This is fantastic because you can keep an archive of all your streams, keep track of your DJ sets.
Learning from each DJ set can be great to get better each time too. The way you stand might need to be better positioned, you might need to interact with the “crowd” more or you may need some better visuals for the camera.
Uploading your recordings to YouTube and social media can be a great way to use as a promotional technique to get your name out there. Also if your viewers have seen your live sets but are wanting to watch your DJ set again then they can. I did a live set this weekend and forgot record the live stream, and I was gutted because a lot of people asked to listen to the recording again. Make sure you record each DJ set in OBS!
Second Web Cam
Add to the professionalism of your DJ live stream sessions with another camera. This could be another phone or even a camera. Either way adding a second camera angle can add to the quality of the watch for your viewers.
The most common camera angles that I’ve seen that you could consider is using an overhead shot of the DJ equipment, whether that be CDJs/Mixer, DJ Controller or Turntables, it doesn’t matter.
Some people out there want to see your skills because they are into DJing as much as you are too. Plus it’s cool to watch other techniques that you may learn from.
The other angle is a side angle, this can be subtle but effective. It can really help with the visual element of watching a DJ play. It sort of mimics how TV productions work too to keep the viewers easily engaged.
Use the Microphone for Shout Outs
Mixcloud is great as there’s a side comments bar so you can see what people are saying during the live session.
If people are commenting and requesting music tunes or shout outs then using the microphone is a great way to big up people. People love hearing their own name and also showing their appreciation for the music that you’re playing also.
On my DJ controller, the Pioneer DDJ-400, the microphone requires a 1/4 Inch Jack Adaptor, seen here. This will allow you to plug in the microphone if it’s naturally a mini-jack input.
Alternatively if you don’t have a microphone, I’ve seen a few professional DJs such as Disclosure and Sonny Fedora use the headphones as the microphone.
Simply plug in the headphones into the microphone input and speak into one of the headphones. Simple little money saving hack if you don’t want a microphone for a while.
Dance and Enjoy Yourself
This tip is a very personal one to me and an observation of other DJs too.
I live for and love music so much, and dancing makes me happy. Guess what, people do too! And if you’re doing that, people will enjoy your DJ sets being streamed live too.
I’ve got feedback from my own live DJ sets and this is one of the positives that I can teach you too. Enjoy the music, dance move to the beat and get into it. Your smiling and dancing will be infectious and get your viewers dancing too.
Even if you get into it too much and your headphones fall off, roll with it, at least you are enjoying yourself. (This actually happened to me by the way, haha!), we’re all human right! 😊
Green Screen for background images
Having looked online there’s a lot of chat about Chromacam, the link is here if you want to check out the website. Xsplit is another option too, I believe these two options are PC only, Mac versions are being worked on for Chromacam.
What this does is give you the chance to DJ in your live set and remove the background shot normally on your webcam. So that means removing the background shot of your living room, kitchen or boring set of cupboards and replacing it with a cool custom image.
The image could be a wall, crazy pattern or simply rainforest the choice is yours. I think it’s even possible to use a video behind it too.
Add a background to your DJ sets live, static image or moving video, will give you a greater level of appeal to your viewers, maybe boost the amount of viewers too.
Logo or image overlays
A quick and easy win is by adding image overlays. This can be easily done in OBS by adding another scene and clicking on the + sign to then add an image.
To get things straight and aligned you will need to move the image(s) as an overlay correctly in OBS. This is because OBS is flexible in letting you customise where the images sit on the live stream video.
You can add you own DJ logo which is great if you want to make sure your videos don’t get ripped off you and re-posted by someone else.
Physical props
There are some amazing looking DJ streams out there at the moment and I’m sure that will evolve over time.
Disclosure have lots plants in front of the DJ equipment, there are some other DJs I’ve seen that use inflatables. You can get inflatables that are palm trees or flamingos for example to add some spice to the visuals on your DJ set stream.
These are only examples but I’m trying to give you some ideas of making the live stream visually more fun and appealing.
The final idea that you can do that Danny Howard and Sam Divine use on their live streams is a lightbox with customisable letters to make you own message. See here for a lightbox example.
Disco Lighting
Get the party going on your live stream with some disco lighting. Especially when the sun has gone down and it’s darker in the room that you’re DJing, the disco lights can add a really great visually pleasing vibe to your live stream.
I’m fortunate enough to have a hanging light above me that has a screw in rotating Disco bulb compatible with the below that I got as a Christmas present 🙂
You can get hold of some disco lights that are USB compatible with your computer or plug socket, which also sit on any table.
