Becoming a DJ is a relatively simple task but practicing in a way that will not annoy the neighbours is considerably more difficult. If you plan on playing loud music, it would be wise to think of ways to soundproof the room you will be using to practice.
So, how do you soundproof a room for DJing? It depends on the environment being used and whether there are many cracks in the structure. Soundproofing aims to close all the cracks so that no sound is escaping the room.
However, there are four steps that everyone should take to soundproof their DJing room, and they include:
- Fill up cracks in doors, walls, and windows
- Install a solid door
- Use soundproof glass
- Add a layer of drywall
This article will delve further into soundproofing a room, including which materials to use, some of the issues you may experience, cheaper options if you are on a budget, and times that you may want to ask someone for help. You would be surprised at how much stuff there is to consider when soundproofing a room!
#1 Fill Up Cracks in Doors, Walls, and Windows
Hiring a professional for this part will prove to be costly. This is because finding all the cracks can take a long time, so they need to pay very close attention to find every crevice. Sound escapes a room through its cracks, meaning that even one crack remaining could render all your hard work useless.
It’s a time-consuming and challenging process to do yourself, so it would be wise to get a friend or family member to assist you because it will help to avoid disappointment down the line. Materials to fill in cracks can easily be obtained.
This is an effective way to have help filling the cracks without breaking the bank. Once all the cracks are filled, it will be easier to start the process of preparing the rest of the room. Be diligent when checking door frames, windowsills, and the corners of walls because those are the places that cracks will be prevalent.
Filling in cracks in materials is not difficult. For walls, you would use something as simple as a joint compound, which is basically easy to use cement.
To do this, follow the below steps:
- Score the crack open to allow you to put the product in.
- Spread a thin layer of the joint compound.
- Cover the wet crack with tape.
- Feather some more of the compound in.
- After allowing to dry, sand with fine sandpaper.
- Repeat feathering and sanding until it is smooth.
Many products can help with this process, such as:
Polycell Multi-Purpose Polyfilla Powder
Polycell Polyfilla Powder has similar properties to cement. The powder is mixed with water to make a cement-like substance that will allow you to fill in the cracks on a surface.
The mix comes out smooth, as well, so it will not dry with bumps. The product is very simple to use and will allow you to fill in your cracks without breaking a sweat.
Fowong Closed Cell Foam Tape
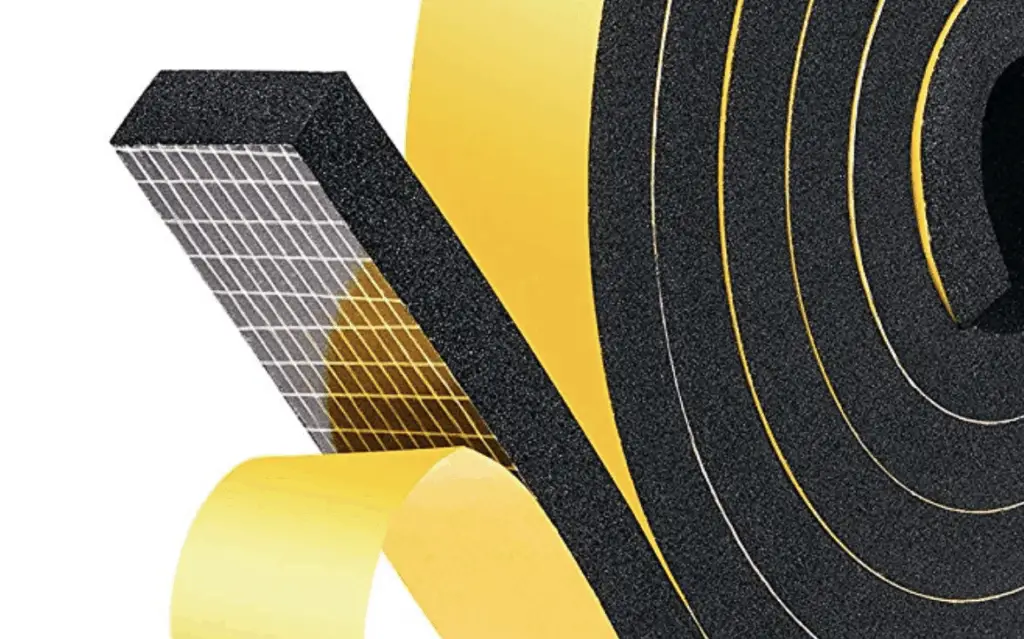
If there are spaces between your door and the door frame, and on your windows, then the Fowong Closed Cell foam tape may be the thing you need. It comes in a wide variety of different measurements, so you have the perfect fit. It sticks firmly to wherever you want it to go, and it can also be cut down to size.
While this tape helps to seal sound in the room via windows and doors, it can also help to insulate a room. No longer will the hot air escape through windows and doors because it will all be kept inside.
The product is simple to use because you don’t have to do any drilling. It’s easy to install from start to finish. It makes absolute sense as to why people are raving about how simplistic and effective foam tape is.
#2 Install a Solid Door
Draught excluders are a safe bet for the bottom of the door because most doors have a small gap between the door and the floor. A draught excluder will eliminate sound escaping from beneath.
However, many people will find they will need to swap out the door of the room to make sure there is no sound escaping. Typical doors installed in homes tend not to be strong enough to stop much noise from escaping.
Most doors have hollow cores and do not block sound well at all. That’s why an entirely solid door is recommended for soundproofing. This will help to make sure that nothing is going through the door.
Some great solid doors to consider include:
Smart Standard Sliding Door
A sliding door could be a great idea because these doors do not require much room and could help if you don’t have much space at either side of the door. The Smart Standing Sliding Door comes in many different sizes, so you will be able to get these to fit any door space.
Snavely International 5-Panel Door
This door is another excellent option. Snavely International doors are well-known for being robust and capable of withstanding force. This will help to keep the sound inside the room. It will be great for a DJ.
#3 Use Soundproof Glass
Not all glass is soundproof, so it is critical to ensure that the glass in your DJ room’s windows are soundproof. If your house is new, you may get lucky and already have soundproof windows.
Figure out whether your windows are already soundproof before you start planning so that you will know whether the windows need to be factored into the equation.
While finding soundproof glass can be tough, some products could help to mitigate the noise.
Pony Dance Grey Blackout Curtains
Pony Dance Grey Blackout Curtains have soundproofing properties, making them an excellent choice for a DJ room to go over the windows. They are also thermal and will keep the room well-heated.
They are made from polyester and are fade-resistant, and based on the thousands of reviews, they do work for soundproofing and stand the test of time. To help with soundproofing, the curtains are comprised of three layers.
Professional Draught Excluders Tape for Doors and Windows
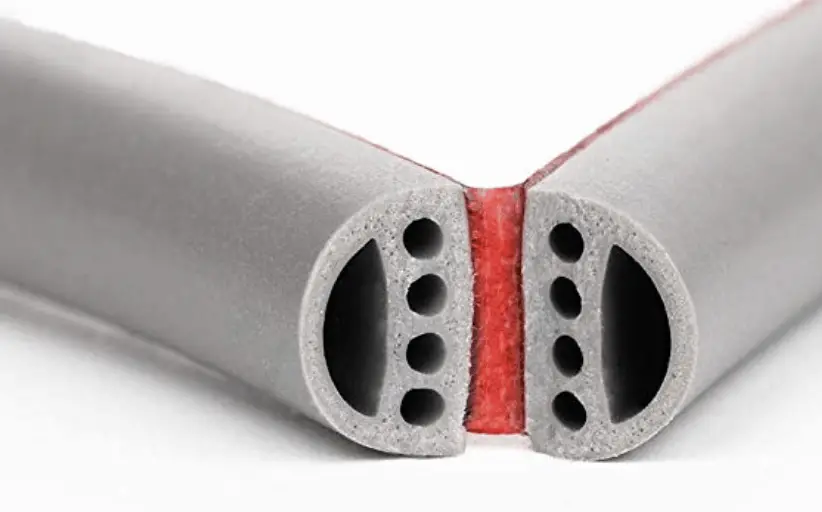
This is another reliable product that allows you to do it yourself. Many windows have gaps between the material and the walls or floors, so adding self-adhesive Professional Draught Excluder for Doors and Windows tape will help with the noise. This is another well-reviewed product.
#4 Add a Layer of Drywall
Not all rooms are made the same. Walls come in different shapes and sizes, so adding drywall will likely be a requirement even if you have already covered all the cracks. Drywall is an extra layer to ensure no sound escapes the room.
The thickness of the drywall will depend on the material that the original wall is made from. If there are still cracks under the drywall, it could lead to further issues. Drywall also costs a pretty penny, but the actual cost will be determined by the skill of the person who is installing your drywall.
Some things to consider when adding drywall, as explained by “Tips for Hanging Drywall Over Old Walls,” are:
- Existing power outlets and light switches may need to be replaced because they may be too small to fit the new, extended wall.
- The jambs of the doors and windows will also need to be taken into consideration.
- After the drywall is installed, be sure to remove the drywall dust because you don’t want it to cause damage to any other part of the wall.
The following products can help keep sound from escaping through the walls, as well.
Acoustic Foam Puskin
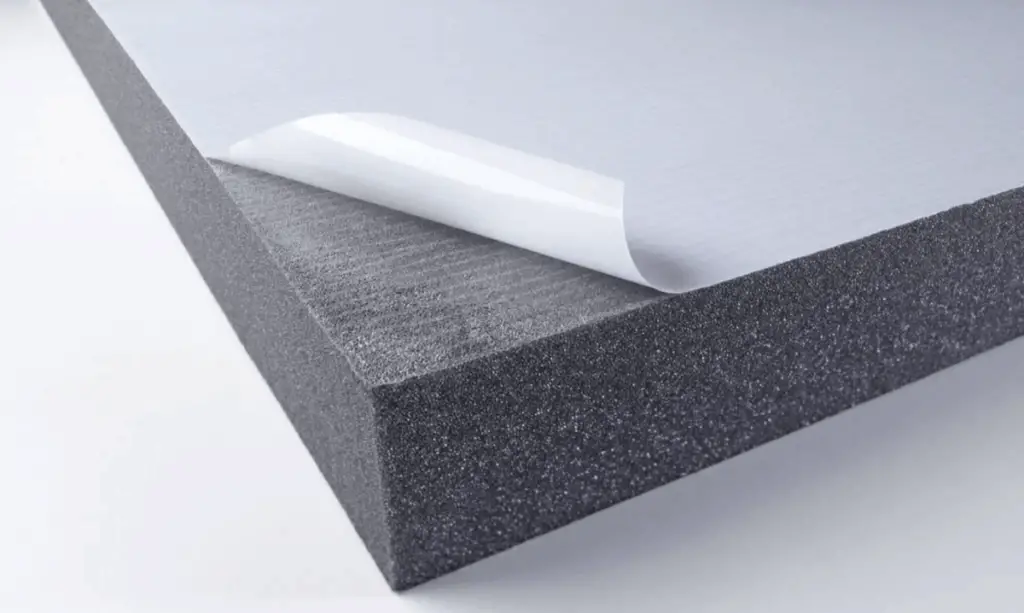
This is another product that will allow you to bring your DJ room closer to being soundproof. These foam panels from Acoustic Foam Puskin are self-adhesive so that you can add them yourself with ease.
The great thing about them is that they are already cut into small panels, allowing you to go ahead and start putting them on your wall right away.
These will help to absorb sound that would otherwise escape the room. Another positive thing is that these panels are not heavy, so they shouldn’t be challenging to put up on the wall.
Advanced Acoustics Studio Foam Panel Treatment
The Advanced Acoustics Studio Foam Panel Treatment is another foam panel, but these are much bigger than the other foam panels on the list (60cm by 120cm and 50mm); therefore, you won’t require as many of them to get the job completed.
These are also coated in a fire-resistant fabric, which will help give peace of mind if a fire were to occur. All of the foam is the same colour which means it will be easier to match. The reviews are solid, complimenting the foam and quality of the product.
3D Brick Wall Stickers
If you’re a fan of doing it yourself, then these 3D Brick Wall Stickers are perfect. They give a beautiful finish to any room, and the best part is that they are self-adhesive. This means you don’t need to mix wallpaper paste or try to hang them with it.
These panels are soft, so they have excellent soundproofing properties. You can cut them to any shape you want, giving you even more control of what design you want in the room. A bonus of the soft density is that these are great in homes with children because it will prevent them from bumps and scrapes if they fall into the wall.
Arrowzoom Super Dash Acoustic Home Studio Soundproof Treatment Accessories Foam Wall Panel Tiles
The Arrowzoom Super Dash Wall Panel Tiles is a great product that has drawn much praise. The panels deaden unwanted sound using absorption panels, meaning that they help to keep the noise in the room and nowhere else. They also help to improve speech, as well, so it’s a good thing for a DJ who likes the audience to hear them crystal clear.
These panels can be attached to the wall or the ceiling, so they are a fantastic extra layer to make sure that the sound is isolated. The panels are stylish, coming in a blue and back or a red and black finish. This allows you to pick the best version for your environment.
Advanced Acoustics Soundproofing Mat
The Advanced Acoustics Soundproofing Mat is another reliable product. This can be attached to the floor to try to keep the noise from going to the people downstairs. It is 2mm thick, so one layer alone has an insulation value of 24dB, while a second layer will crank that up to 29dB.
The company notes that it should be sandwiched between two layers of high-density acoustic plasterboard. This will not only keep it in place, but it will also give another layer of protection from the annoying sound. This is another well-reviewed product, with people liking how easy it is to install, as well as the results.
Easy Soundproofing Tips
Deciding on how to soundproof a room is a big one, but Popular Mechanics offers some excellent soundproofing ideas in the article, “How to Soundproof a Room.” These will help in the short term to allow you to assess what other work needs to be completed.
- Weatherstripping is a great way to lock in sound while helping keep cold air out. Not many doors in the house will already have weather stripping, so this can be beneficial for the entire household. Weatherstripping comes in the form of seals.
- Rugs are another reliable option to try to get rid of sound. Setting the rug on an extra-thick pad could do the trick.
- To help alleviate the vibrations from speakers, setting them on a big piece of foam is an option. This will stop the vibration effect from spreading throughout the entire household.
- Window inserts meld to the existing window to help absorb sound.
- Build a bookcase around the walls. It’s not difficult to do, and if you have lots of books and magazines, it will give you somewhere to store them and help keep the sound inside the room.
How Much Will It Cost to Soundproof a Room?
Because every single room is a different size and made from various materials, it’s tough to give an accurate figure. However, “How to Cope With Noisy Neighbours: Soundproof Your Home” states that the average price is £130 to £370 per square metre to soundproof floors, walls, and ceilings.
That is quite a bit of money and soundproofing those three parts of the room may not be enough. Like we have already stated, sound can escape from windows and doors, so be sure to cover all your bases if you are going to pay someone to soundproof your room for you.
Soundproofing FAQs
Q. Will I lose space in my room?
A. Even if you don’t get the room soundproofed professionally and opt to put foam on the floor and ceiling, you will lose space.
That’s something that needs to be considered, especially if the room is small to begin with. It may be worth your time moving to a slightly bigger place in the house, if possible. If that is not possible, then measure the room in correlation with the thickness of any materials you are fitting to see if it will be worthwhile in the end.
If the room is already cramped, measure what you have in it, and how much you would lose. Draw up a plan with where everything will go to be sure everything will fit in it. If some of it will not, then think about what you could shift into another room.
Q. What if my DJ space is above a garage?
A. Many people will use the room above their garage for the DJing because there’s nobody below, but garage doors are not the best at keeping sound in. This means that if you have soundproofed the walls, windows, and doors, the sound could still seep down into the garage and out the door.
This could prove to be a nuisance for neighbours or passers-by, depending on the way the houses in the community are laid out. That’s why, even if you know a garage is below you, you need to remember to insulate the floor or take a look at new garage doors. It may sound like an afterthought now, but it could render all the work you’ve done on the room useless if you don’t consider that.
The issue with garage doors is that they are generally thin because they are made up of metal. However, this can be remedied if you are considering swapping the garage door out for something more substantial. There are garage doors that come with foam on the inside, but these do come at a higher cost.
Q. Why do resilient channels help?
A. If you’re installing drywall, then it would be a great idea to install a resilient channel, according to “Soundproofing Walls and Ceilings Using a Resilient Channel” These are z-shaped metal strips that go between wall studs and drywall. They give you a decoupled wall that will stop sound from passing through.
It is an extra layer of protection, and an inexpensive supplement to the drywall to make sure that absolutely no sound is getting between the wall and any other room in the house. They are affordable to purchase.
However, not all walls have the studs you need to screw them into, so be sure to check out your walls to know if you will be able to use them before making the purchase.
Q. Could floor squeaks ruin all the hard work?
A. If you’re putting thick carpet or foam on the floor, you need to consider the floorboards below. If there is a squeak before you start the work, it will probably still be there after even if you don’t hear it.
If someone is in the room below, there’s a good chance they will hear it, and it could cause problems, especially if you like to practice your DJ skills in the middle of the night.
Here are some tips to fix, according to Popular Mechanics:
- Check for nails that have missed floor joists. These are likely the reason for the floorboard moving, and in turn, squeaking. Cut those nails off and swap them out if necessary
- If you find a gap between a joist and the floorboards, try to fill them in with glue.
- If that is not possible, then put a screw through the subfloor, but ensure that it is a screw small enough so that it won’t go through the floorboard. You don’t want to damage them.
- Squeaks coming from between joists could signal a bridging issue that means there is not enough bridging for the wood. It may be the case that you need to swap out the bridging or just add more
- It would be a good idea to force a glue nozzle through the gaps that are still causing issues. If you fill it up with strong glue and let it go hard, it should stop any movement.
- The last resort is to put nails through the board at a slight angle to keep the boards in place. The reason this is the last resort is that it can cause problems down the line if you are making changes to the flooring.
Q. Is it possible to soundproof on a budget?
A. The cost of soundproofing can add up quickly because there are so many different things that can be done. It is possible to soundproof on a budget.
Here are some cost-saving tips.
- Use blankets on windows. It may not look good, but it is a great way to save money and to soundproof the windows.
- Lay down additional rugs if you find that sound is still escaping the room.
- Having a carpeted floor as opposed to tiles or laminated flooring will help. Hard surfaces can cause an echo, while softer surfaces help to absorb sound.
- Quilts, blankets, and tapestries can also be fixed to the wall if you don’t want to shell out the money for foam or drywall.
- Egg cartons can be placed on walls to help control sound.
- Brand-new mattresses can even be used. They are thick and will trap air. It may not be visually appealing, but it will help greatly.
- Another thing you could do is fill the wall with your favourite old sports team sweatshirts because anything soft will absorb some of the sounds.
- If you have access to a room upstairs from the DJ room, make sure there is a thick carpet or even a soundproof rug. This will stop the sound traveling overhead and will give you even more soundproofing if people upstairs do not want to hear the music.
- The more furniture, the more opportunities to absorb sound! If the room is virtually bare, consider putting more furniture in. You could check garage sales to get things for cheap.
Q. What else should I consider?
A. Because there are so many variables while constructing a soundproof room, there are still some other things you need to take into consideration. They are:
- A creaky door could ruin all of your excellent work. Make sure the hinges are always well-lubricated to avoid a creak in the middle of the night, waking up the entire house.
- Make sure to use non-flammable materials. DJing equipment can be costly, and if a fire does start, you don’t want it to spread quickly.
- Keep a fire extinguisher in your DJ room.
- A noisy fan could also be an issue for you. Make sure to swap the fan out if it’s built-in while you’re soundproofing the room.
- If you do go to the budget room and use blankets and quilts, make sure they are in colours you like. If they are a mixture of colours you hate, you are not going to enjoy being in the DJ room. Make the room your own!
- Before moving your equipment into the room, vacuum away any of the dust remaining. The reason brushing is not the best course of action is that it could send the dust into the air to rest on your insulation, and it could come back when the music is playing.
In Conclusion
There are various ways of soundproofing a room, but there are many factors that need to be taken into consideration.
Assessing whether it will be a difficult job to pull off as a DIY project is a must because if any problems arise and need to be rectified, you may find it would have been cheaper to get a professional to carry out the work.
It all comes down to how skilled you are at working on DIY projects, and whether you have the time to commit to it when someone else could have it completed while you are doing more important things.