Looping music in your DJ sets is a highly creative way to build energy, and mix transition between tracks. There are different ways in which to use looping so I thought I’d put together a short guide full of tips to get your started.
What is looping on DJ Controllers?
Loop function on DJ controllers allows DJs to infinitely repeat a section of music. Using the IN and OUT buttons control looping for a given amount of beats. The IN button sets a start point, OUT button activates when the loop repeats back from the IN point again. Loop length can be controlled by left / right arrow buttons e.g. 2, 4, 8, 16 beats, and loops are activated or de-activated by the ON/OFF button.
There are different ways and functions to utilise to activate loops on a DJ Controller, let delve into them.
NOTE: In this article I will be using the DDJ-400 by Pioneer as the DJ controller for demonstration purposes. .
Beatmatch Guru’s top recommended DJ Controllers, click here.
Activating Loops Manually with IN & OUT buttons
As mentioned above, most DJ controllers feature buttons that allow DJs to manually activate looping of music.
Essential buttons for activating loops manually include:
- IN / OUT buttons
- Left & Right Arrow buttons
- Activate / De-activate buttons
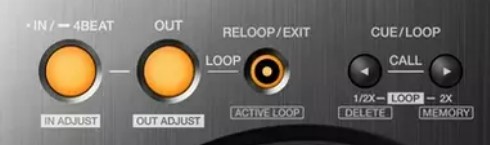
IN / OUT buttons
Press the IN button for the point in which you want the loop to start.
Out button will activate the point in which the loop will return the play head back to the IN position just set.
Left & Right Arrow buttons
Left arrow button allows you to shorten the loop e.g. from 8 would be 4, 2, 1, 1/2, 1/4 etc.
Right arrow does the exact opposite and increases the amount of beats, from 8, the beats usually go to 16, 32, 64, 128 etc.
Activate / De-activate buttons
Activate button simply allows you to switch the loop ON or OFF. Usually once you’ve set the loop you’ll want to focus on doing your transition and then once you’re done switch off the loop.
Struggling to DJ?… Yes!
Pre-saving Loops that Auto-activate
Auto-activating loops are great for your planned DJ mixes. Also if you know that you don’t want a music track to go beyond a certain point, therefore allowing you more time to start mixing in a new track.
Once setup and saved to a particular track, you don’t have to ever do anything on the DJ controller or software, the loop will automatically start looping from the given point you’ve saved it.
There’s a few steps to follow in order to have auto-activating. Let’s use Rekordbox to show off this example.
Step 1. Set the Loop
Set a loop from a specific point in which you want the loop to activate automatically in the future. I recommend 8 or 16 bars can work well.
Try to pick a section that’s not the first beat of the bar because sometimes you’ll find that there’s a crash cymbal on the first beat of a phrase. It can sound slightly annoying when being played as part of a loop.

Step 2. Memory Cue
Set and save a memory cue at the beginning of the loop. Save a name for the memory cue marker if that helps to remind you that there’s a loop there.
Step 3. Click loop icon
On the memory cue itself within the tile box, there will be a small loop icon, click on this icon and it will turn red.
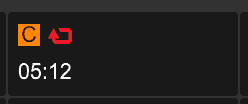
This now means that every time you play this track the loop will auto-activate when the cursor reaches the beginning of the loop.
Top Tip: Are you using Rekordbox? Check out Beatmatch Guru’s top 23 Rekordbox Tips for DJs. Click Here.
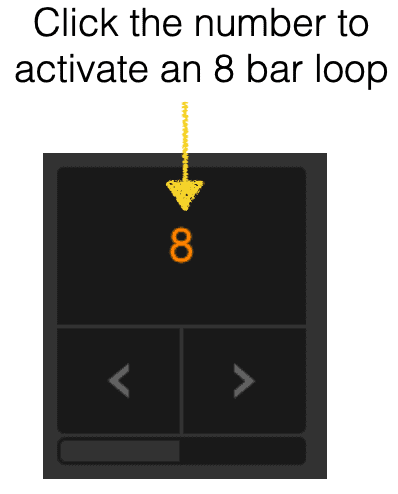
Activating Loops with Peformance pads
Another technique to activate loops is by hitting the performance pads. There’s usually a category on your DJ controller that allows you to hit various beat counts that activate a loop. As soon as you’ve hit the performance pad associated to the beat count e.g. 8 beats the loop will instantly activate.
Using the performance pads is great to flick between the different loop counts. Some DJs use this to quickly activate a loop of a specific amount of beats. Then they choose to use the two left and right arrow buttons to make the loop count shorter and shorter. Great for performing build up transitions into other tracks or even fading out a track with a really short loop.
Top Tip: Using FX such as reverb or low cut echo can support the transition of a loop being faded out.
BONUS DJ LOOP TRANSITION TUTORIAL