DJ controllers have become a lot more popular in the DJ scene, mainly due to the price, how lightweight the devices are and the portability aspect.
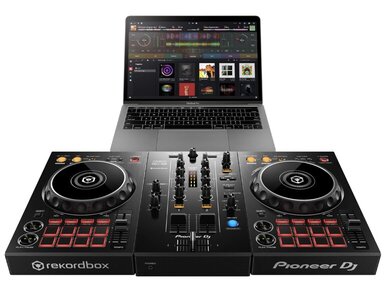
The DDJ-400 by Pioneer is one the best DJ controller for all types of DJs. For example:
- beginner DJs
- vinyl DJs looking to re-kindle their love for DJing
- professional DJs looking for a bit of fun.
In this review of the Pioneer DDJ-400, you will get all the low down on:
- the DDJ-400 the product itself,
- tricks on how to use the DJ controller
- how to utilise the DJ software Rekordbox too
Let’s get stuck in.
Firstly I thought we’d address what a DJ Controller actually is.
What is a DJ Controller?
Simply put a DJ controller allows DJs to control the music linked to DJ software on a laptop.
How To DJ with a DJ Controller?
DJing with a DJ controller requires the same skills and fundamentals that any DJ needs when DJing using CDJs or record vinyl turntables.
These skills include:
- beat matching
- music theory
- rhythm
- tune selection
- technical knowledge
The main differences of DJ Controllers, such as the Pioneer DDJ-400, include:
Performance pads, which aren’t as common on DJ equipment such as CDJs or vinyl turntables. Performance pads control cue points, DJ FX and other functions available in DJ software such as ‘Beat Jump‘ and ‘Looping Beats‘.
Laptop and DJ software is usually required to play music via a DJ Controller.
REMEMBER LEARN TO DJ on the DDJ-400 with our DJ Course here, to learn quickly in a step-by-step logical way.
Review of Pioneer DDJ-400
I’ve DJ’d a tremendous amount with the Pioneer DDJ-400, in bars and at home. I’ve got to grips with it fairly quickly, and I’m going to share with you everything I know.
Pros
- Price is highly affordable when compared to other devices
- Lightweight and easy to carry to gigs when required
- Easy to setup and plug-in
- Medium sized dimensions, which is great for setting up at home
- Offers fantastic functionality that bridges that gap for beginners and advanced DJs (fun for all audiences)
- Compatible with Rekordbox, which also offers a decent connection to music streaming services such as SoundCloud GO+ and Beatport LINK. FREE to use when you buy the DDJ-400.
- Connects to your laptop which makes it fairly easy to access your music.
- DJAY compatible (by Algoriddim) which is great if you don’t like Rekordbox. DJAY connects to TIDAL, SoundCloud GO+, Beatport LINK and Beatsource LINK.
Cons
- Limited to DJ Software Rekordbox (not ideal if you love Serato for example)
- Uncertain how easy it is to fix if a channel fader breaks for example
- Master speaker outputs are limited to only RCA output connections only (more advanced DJ controllers offer multiple outputs / various types e.g. XLR, 1/4″inch Jacks)
- Output volume isn’t always the strongest compared to other DJ controllers. (I’ve found this most annoying at bars where their Amp or PA system isn’t of the best quality.
- You have to pay for DJAY DJ software if you want to use it.
FAQs & Things to consider
Which is better DDJ 200 or DDJ-400?
The DDJ-400 has the edge for me personally. If you want to connect a laptop to a DJ controller vs say a tablet or mobile, then the DDJ-400 is for you. The DDJ-400 has more functionality available in comparison and has master volume outputs allowing you to connect to speakers directly from the controller. The DDJ-200 is bluetooth connection to a device only.
Can you scratch on Pioneer DDJ 400?
Yes. It’s easy to scratch on a DDJ-400, the jog wheels are sensitive allowing you to have control and scratch. Remember to set the crossfader settings within Rekordbox to be a sharp curve to help get those tight scratches down.
Do you need speakers for Pioneer DDJ 400?
It’s not essential to have speakers with a DDJ-400, two options are to use the audio output of the laptop OR use your headphones to listen to the MASTER mix when DJing. So there are ways around it if you don’t have speakers yet.
Do you need a laptop for DDJ-400?
Yes. A laptop is required to power up the DDJ-400 itself and also connect to the DJ software.
What do I need for a DDJ-400?
Essential items you need for the DDJ-400 include:
- USB cable
- Laptop
- Laptop stand (helps your neck when DJing and bouncing to the beat)
- Adaptors
- Rekordbox DJ Software
- Headphones – mini-jack connection
- Speakers
- Audio cables RCA to whatever connection type your speakers require e.g. RCA, XLR, Jack.
- Carry case
Can you gig with DDJ-400?
Yes. I personally DJ in bars in my local area with the DDJ-400 and laptop setup.
Does DDJ-400 work with Spotify?
No. Spotify appears to not want to connect to any DJ software at this particular moment in time.
Does DDJ-400 have Bluetooth?
No. The DDJ-200 on the other hand does offer bluetooth connection to tablets and smartphones for example.
Setting Up the Pioneer DDJ-400 DJ Controller
Setting up your DJ controller is simple and easy to achieve. Let’s explore how to do this below using the Pioneer DDJ-400 DJ Controller as an example.
Quick setup
Step 1) Connect the usb cable to the back of the DJ controller, then the other side into the laptop you’re going to use with Rekordbox installed.
Step 2) Connect speakers to the outputs (RCA, phono)
Step 3) Connect headphones to the mini-jack output.
Rekordbox DJ Software
Rekordbox is the default DJ software that arrives with the Pioneer DDJ-400 and I can tell you as an avid fan of Serato I’m impressed with Rekordbox and I love it. The best features that come in very handy that I use often are the automated ‘Related’ songs section and dj set history. Both are great features and help you to curate new DJ sets very easily.
Installation
Assuming you’ve been provided Rekordbox with your DJ controller then you won’t have to buy it. If you need to buy it then you can sign up to a subcription of the DJ software or buy directly for around £120 ($156).
Download Files
To install Rekordbox find the download page from their website. A license key should of appeared somewhere with you purchase of the DJ controller or via email if buying Rekordbox separately. Follow the instructions after downloading the Windows .exe or Mac dmg installation files.
Check System Requirements
Before installation always check your computer system against the DJ software ‘System requirements‘. There’s nothing worse than purchasing DJ software and equipment only to find out that your laptop is slow and old. Trust me I’ve been there, hence the upgrade to a MacBook Pro from a 2008 Macbook, old school!
Check Compatibility of DJ Equipment
Triple check that your DJ equipment is compatible with the DJ software you’re looking to purchase. For example you can do this on the Rekordbox website. They have a really good page detailing the products that it works with well. Again this is for you guys that might of bought Rekordbox or other DJ software separate to you DJ controller.
Settings
Quantise
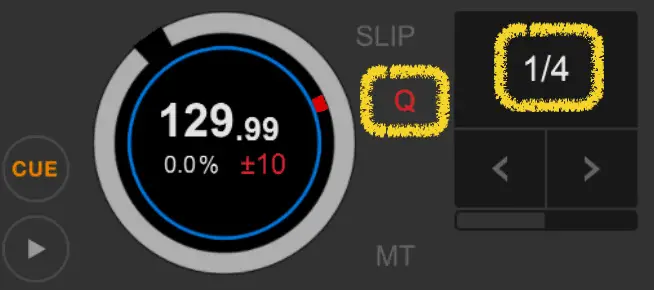
Setting quantise on Rekordbox is a fantastic tool that snaps grid lines on the audio track that’s loaded onto a one of the turntables. Each snap to grid line is attributed accordingly by setting the bar split e.g. 1/8, 1/4 or 1/2 and therefore allows you to set cue points and use loop functions easily.
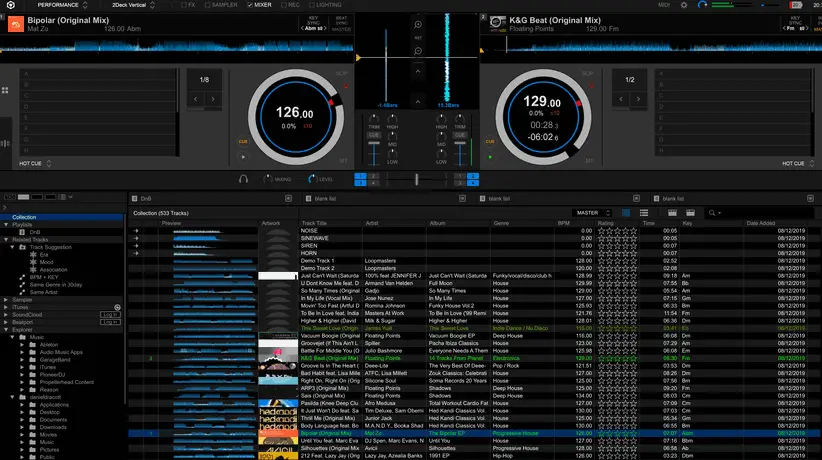
Performance View

To get the correct view for DJing your music make sure you select ‘Performance’ this will allow you to play music and record your DJ mixes.
Recording
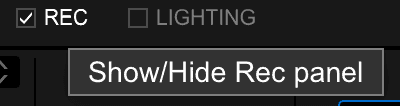
To record your mixes find the view options at the top left of the Rekordbox software. There’s an option to select ‘REC’ this will show you the settings for recording your mix. A record button will appear just above the track listings. A drop down menu will appear to allow you to select the channel in which you want to record a mix. Sticking with Master usually works for recording a mix.

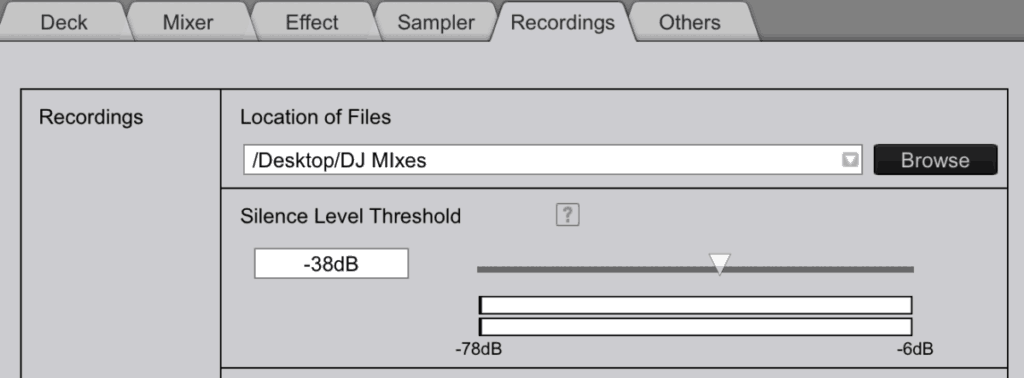
Before recording your mix remember there’s an option in settings > ‘Recordings’ where you can select the location of your recording files. Adding them to the desktop helps find them quickly or save to an external hard drive.
Equipment
Connecting it all together
Laptop
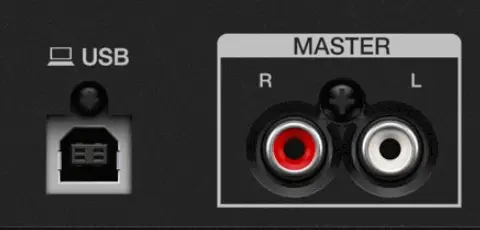
Use the USB cable from the back of the DJ controller and connect the other end of the cable to the laptop. Once this is achieved you will see the DJ software change and two turntables will appear ready for you
Speakers
There’s usually two phono connections, white and red outputs, this is where you can connect your RCA cables to the back of the DJ controller. The other end of the cables will then connect to the back of each speaker.
I use Yamaha pre-amp speakers and have used them for years, around 12 years I’d say now. The major benefit is they save space because you don’t have to buy a separate amp as they are pre-amp speakers.
Importing & Syncing Music Tracks
To import music tracks into the library section on the left hand panel of the DJ software you have two options.
Option one is to purchase your own tracks and download them to a folder on your computer, in my setup I save the tracks to an external hard drive. Then I can import the tracks to a particular playlist folder that I’ve setup in Rekordbox.
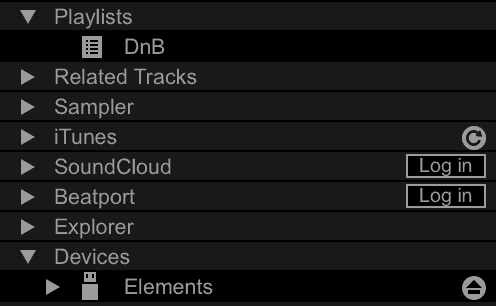
Option two is easy to achieve but requires purchasing a subscription to a streaming service with SoundCloud or Beatport. Once you’ve signed up to either one of those streaming services then you simply need to login after clicking the login button and you’ll get access to the music featured on the streaming provider.
What All The Buttons Do?
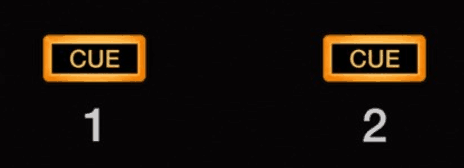
Cue Button
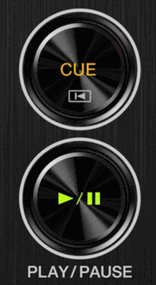
There are two circle Cue buttons on a DJ controller. Both allow you the DJ to play a specific track loaded onto either channel. Pressing and holding the cue button with your finger temporarily plays a track, if the button is released then the track stops playing and returns to the cue point of the music track.
Play Button
Play button is also a circle button which plays the music track of the related channel. The play button is the same as the Cue button but instead plays the music track even after release of the button. The purpose of the play button is to simply play the track so that you can start mixing and make any adjustments to the jog wheel for tempo control.
Pitch Shift (Tempo control)
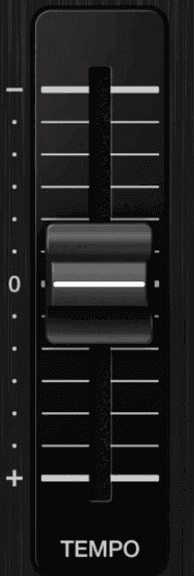
The pitch shift exists on both turntables and gives you control over how fast or slow you want a specific track be.
Pitch shifts help you to achieve setting the correct tempo to align and sync beats together, as known as beat matching.
EQ Knobs (High / Mid / Low)
EQ knobs allow control of each channel’s high, mid and low frequencies. Each EQ knob can be used to take away or add high, mid or low frequencies. This feature is generally used by DJs to achieve smoother transitions between tracks and eliminate any clashing frequencies between two tracks.
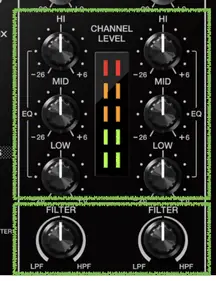
Filter (LPF to HPF)
A great feature on the Pioneer DDJ-400. Similar to EQ knobs, the EQ filter knob allows you to simply cut out the high frequencies or low frequencies with one control. This can be simply achieved by twisting left or right on the filter. Really great control feature when transitioning between tracks.
Track Selection Switcher
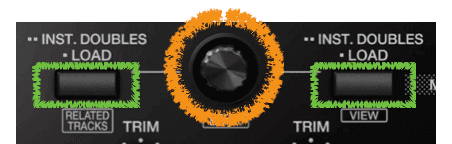
Not all DJ controllers have this available, but the DDJ-400 does. There’s a control knob for each channel. Each can be used when the DJ software is active and you have tracks available to select.
Twist the knob to move up and down your DJ software and when you like a specific track to DJ with, press the button next to it. Your new track should be loaded onto the desired channel ready for mixing.
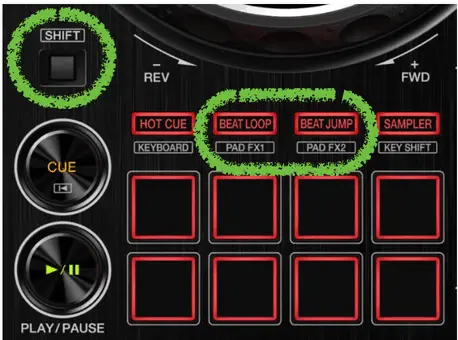
‘Shift’ Button
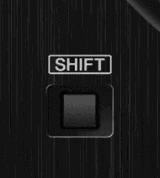
The shift button when held down allows you to select secondary functions on the DJ controller.
Some buttons and controls on the DDJ-400 have two functions, one function without holding the shift button and another with holding the shift button down.
Performance Pads
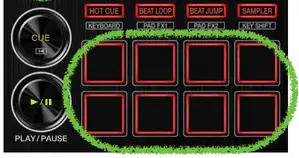
There are eight performance pads that you can use to play hot cues, samples, beat loops and effects. The performance pads are a great feature of DJ controllers and give a creative performance edge over traditional CDJs and vinyl turntables.
Channel volume
Channel volume controls simply control the amount of volume that is given to either track A or B. Some DJs put the crossfader in the middle allow control of mixes using the channel volume controls. This can be personal preference for a lot of DJs, especially if using echo or reverb to cut tracks to create suspense in the mix.
Gain (Trim)
Gain is available for each channel. Gain simply controls the amount of signal that is provided to each track.
Gain is used to manage head room for each track and makes sure that the signal per channel does not reach the red, which is known as redlining.
Master volume
Master volume is the total volume that is being sent from the mixer. It controls how loud or soft the audio is being sent to the speakers from the mixer of the overall mix.
Headphones / Mix / Master knob
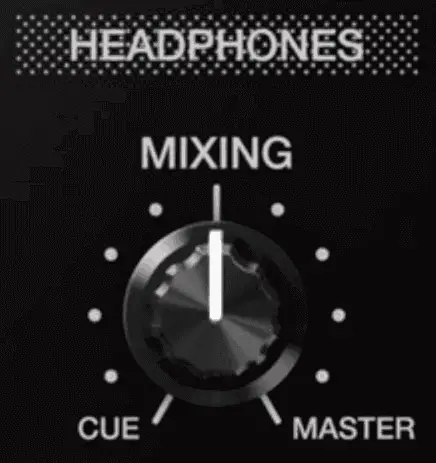
The headphones section on the DJ controller allows you to switch between ‘CUE’, ‘MIXING’ and ‘MASTER’.
CUE allows you to list the track that you’ve selected cue for a particular channel, either 1 or 2. If both cue buttons are selected you will hear both tracks when the headphones knob is switched to CUE.
MIXING allows you to hear both channels for when you in the middle of a mix and beat matching two tracks together.
MASTER is a great setting for when you’re happy with the mix and the beats are all matched together. You can listen to the live audio that’s being played to the audience and start using the EQ and FX etc to transition to the new track in the mix. This can be a great option if you have no speakers or want to play the speakers low in sound with the headphones cranked up louder.
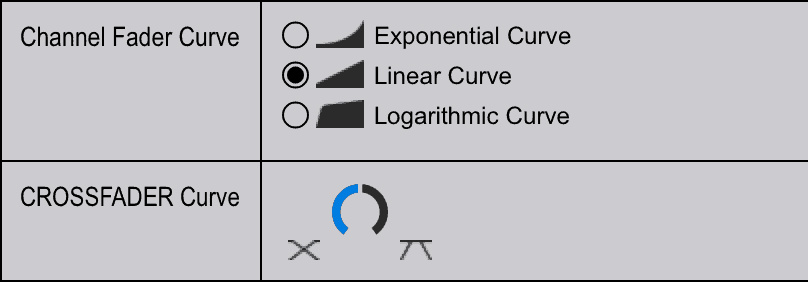
Crossfader curve setting
In the settings within Rekordbox you can set the crossfader curve that best suits your style of music genre and DJing techniques. DJs that scratch like a short curve allowing audio to play almost instantly when moving the crossfader. For DJs that want to mix music smoothly in the transition then a more linear curve would be best. See settings below.
Click the cog icon top right of the screen, then click controller, then click mixer tab, then apply the crossfader settings.
FX Buttons
The performance pads on the DJ controller offer various FX that can be added to the specific turntable in which the pads are situated.
To access the FX on the Pioneer DDJ-400 you need to use the Shift button and press one of two FX selections e.g. PAD FX 1 or PAD FX 2. In doing so this will activate the FX for the pads giving you a variety of FX to play with on the pads.

As you can see from the diagram on Pioneer’s website, there are 32 different FX available for you to play with. The shift button is amazing as it gives access to multiple different FX with less buttons presented on the DJ controller. It’s worth playing around with these FX pads if you like to add a bit of creative flair to your DJ sets and mixes.
How To Use The Jog Wheels?
There are two purposes of the jog wheels on a DJ controller.
Firstly you can use the jog wheel the exact same method as cueing up a record vinyl on a turntable to beat match with another track. The jog wheel simply acts the same as a turntable. To do this you need to touch the top of the jog wheel.
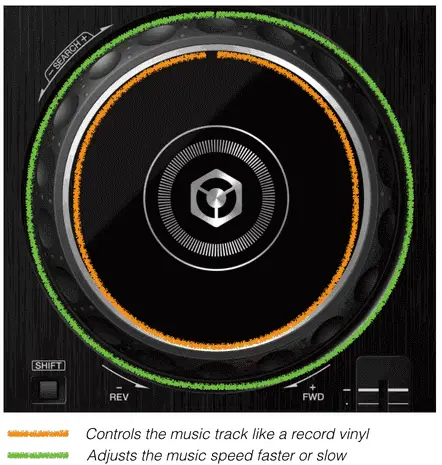
Of course it’s possible to leave this option altogether and use the ‘Cue’ button and ‘Play’ button to achieve the same outcome, this is arguably the simpler of the two options.
Secondly, you can use the jog wheel to re-adjust a music track to be more in line with the beat of another track by using the platter. The platter is the large dimpled section on the side of the jog wheel. It’s possible to slightly slow down or speed up a track. This technique is also very similar to using a traditional record vinyl turntable or CDJ.
DJ Controller Tips for Beginners
Crossfader
Firstly when you get started with DJing my advice would be to simply practice mixing tracks with the crossfader. This will give you a good opportunity to build you knowledge and experience of mixing tracks within the right phrases or sections.
Keep it less complicated at the beginning, learn the basics of beat matching and understand phrase matching.
Cue/Play vs Jog Wheel to cue tracks
Cue/Play
Decide which technique suits you better. As mentioned above you can easily use the Cue and Play buttons to cue up tracks to start beat matching with the current track playing live.
To cue up a track simply tap the cue button to the beat of the current live track and then press play when you want to play and beat match the track. Pressing play simply plays the track and doesn’t stop when you release the play button, the cue button stops the track upon releasing the button.
Jog Wheel
The jog wheel holds the same principle in the fact that you can move the first beat of the track. Instead of tapping a button you are moving the jog wheel like a turntable. Release the jog wheel when you want the track to play.
My top tip here is to pick one method that you prefer as you will find yourself learning a lot quicker. The cue button is probably the easiest of the two if you’re completely new to DJing. DJs that have mixed on CDJs or turntables before might find using the jog wheel a lot easier.
Cue point setting
I’ve talked about this a lot in my recent blog posts. Cue point setting is efficient for DJs to line up tracks ready to mix more creatively and certainly a lot quicker in mixing in new tracks.
Listen to your DJ tracks and set cue points throughout the audio. My advice is to:
- find a cue point to set half way through an intro, this will help speed up the time it takes to mix in a new track to then blend in the breakdown or a drop.
- find a cue point to set at the first beat of a breakdown, this will really help to mix two breakdowns together. Could even set you up to double drop two tracks together or simply blend into the new track.
- set cue points to where you might want to ‘sample’ or ‘loop’ certain sounds within the audio. This will allow you to use the performance pads to be creative with samples and looping.
Control redlining with the gain knobs and master volume
A classic mistake for beginner and experienced DJs is hitting the red lights on both channels on the mixer. Distortion of sound is created when each channel signal is hitting the red. Use the gain buttons on each channel to provide head room for each track allow for maximum quality of sound to reach the speakers and the listeners ears.
Note that there are gain knobs DJ controllers as well as within the DJ software if you need to adjust them there too.
You may come across audio tracks that are overly processed and way too loud. Also the opposite might happen too, which new demo tracks they might not be mastered that well so might require turning up the gain a lot more to even hear the track.
Mix by ear and not using the audio waves on the DJ software
On your DJ controller you might have a digital screen that shows the audio waves moving after you’ve hit the play button. The DDJ-400 does not have that but still shows on the DJ software Rekordbox.
My advice is to cover up the audio waves showing on the digital screen with a piece of paper. If you have the DJ software try to do the same or move the window out of sight.
My advice here is to make sure you don’t overly rely on using the visually beat match tracks together.
The number one important skill is to beat match by ear, if you can do this you can DJ on any equipment. 👊
Practice mixing songs that are similar or the exact same
When I first started DJing I had two things to contend with, getting used to beat matching tracks together and getting used to the equipment that I had just bought.
If you’ve just bought a DJ controller, my top tip here is to pick two tracks that you know really well and just beat match mix those a few times until you get to grips with mixing by ear and how the controls feel on the DJ controller.
Practice mixing songs with simplistic 4×4 beat to learn how to beat match
Don’t overcomplicate things by DJing music genres that have super complex beats. I started DJing Garage and Drum and Bass, separately of course. The beat patterns of these two genres are complex and offer a lot of variety when build your music library of tracks.
Top tip here is to stick to two tracks within your music genre that have the same or similar beat pattern. Or pick house / dance music as the 4 x 4 beat pattern is really easy to mix.
If you’re stubborn and don’t care about simplicity then fair play to you, it’s likely you’ll become a way better DJ in the long run. And when it comes to mixing house music, it will be so easy.
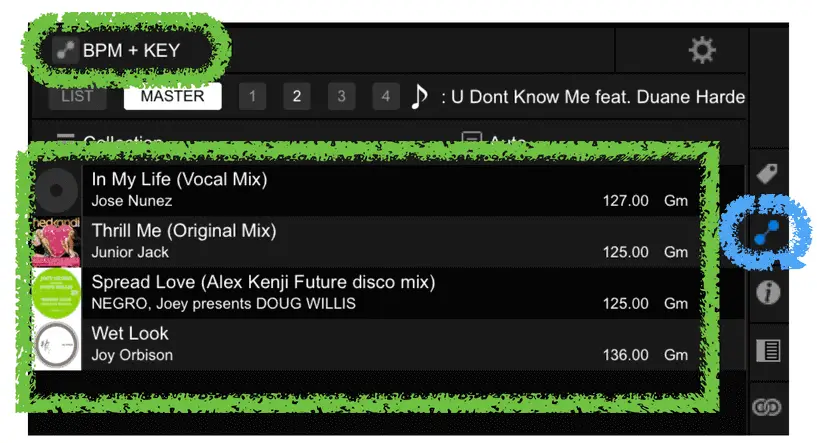
Use the ‘related track display window for new track ideas to mix
There’s a great feature that I’ve started to get into using a lot and that is the related track display window. This window can be activated by clicking on the second icon* down on the options on the far right hand side of Rekordbox.
Related tracks will show only when there’s a track loaded onto the channel within the DJ software. From there the window will show related tracks with similar key and bpm. This is a great way to get inspiration for mixing other tracks together and build better quality DJ set lists.
*see blue icon circled in blue to access the related tracks.
Advanced Mix Transition Tips
EQ
Using EQ is a great way to add smoother transitions to your DJ mixes on top of using the crossfader.
Top tip when using EQ is to make sure that when you play two tracks together two to equalise the channel EQs so that you don’t end up in the red. This will just cause distortion out of the speakers. The trick is to make sure two frequencies aren’t clashing and becoming muddy in the mix transition.
FX
When you add an effect to one of the channels for example reverb, my favourite technique is to cut the channel volume down. What you get as a result is the reverb still in effect and the track is not being heard any more.
From there you can swiftly flick up the channel volume to the beat of the snare of the opposite track. If you’ve ever heard DJ EZ play a DJ set he uses this technique a lot to build suspense and showmanship. It’s a really great way to build suspense being drop the bass line of the next track.
Looping
Use looping in a similar way to effects. Loop a 4 bar sample on a track that you are about to mix out and reduce the loop to 2 bars, 1 bar, 1/2 bar, 1/4 bar, 1/8 until the loop sounds rapidly fast.
Gently fade out the loop with the crossfader or LPF knob and use this to drop in the bass line of a new track. James Hype uses this technique in his DJ sets and builds up the next track really well, where as without it there would be much of a build up.
Hot cues & samples
Use hot cues creatively in your DJ sets by firstly setting them to sections of a song that are catchy.
What you can do from there is play about with the different sounds throughout a track that is playing live on the opposite channel. I find this can signify and tease in the next track letting your audience know what is upcoming in the mix.
Sometimes you can use this to simply tease the audice and play it as a bit of a mashup live performance if the samples go well with the track. You could experience doing this with a simple accapella vocal track or instrumental track too.
Recording a Mix

To record a mix click on the red record button. Make sure that you test the audio is not clipping in the red before recording your mix.
Once you’ve recorded your mix I would highly advise putting the recording into Audacity or Ableton for example and post edit the audio file. In doing so you can:
- Edit and cut out any dead sound before and after the DJ mix
- Normalise the the sound to be louder if it’s not that loud
- Amend the sound at certain points throughout the mix if there are peaks in sound.
The end result will help to polish off your DJ mix ready to be shared on social media and Soundcloud for example ready to make a name for yourself.
Remember you can check out DJ Course here, to learn quickly in a step-by-step logical way. CLICK HERE
Related Questions
What does a DJ controller do?
A DJ controller allows a person to beat match and mix audio files together from one channel to another. Pitch shift sliders allow control over tempo to match the beats of two individual tracks. Two jog wheels are used to control the audio per channel which enables a track to be played. Depending on the DJ software video can be controlled too.
What’s the difference between a DJ mixer and a controller?
A DJ controller is an all-in-one system that contains both a mixer and two turntable jog wheels. A mixer is simply a mixer and does not contain turntable jog wheels. In order to play music from a mixer two turntables are required to be connected to it, whereas a DJ controller plays music independently.
Do I need a mixer with my DJ controller?
A DJ controller does not require a DJ mixer to accompany it. A mixer is in-built within a DJ Controller and simply connects to a laptop containing DJ software in order to play music.